





How to Use Mac Mini: Setup, Server, and Smart Tips
You've probably got the box on the desk already, or you're staring at a Mac mini page trying to work out whether it's a sensible choice for a spare monitor, a student desk, or a small office corner in Singapore. The short answer is yes, but only if you treat it like a compact system you build properly, not a laptop replacement. The Mac mini is deliberately barebones, so the way you unbox it, wire it up, and decide whether it stays as a desktop or becomes a quiet server makes all the difference.
Table of Contents
- Unboxing and Getting to Know Your Mac Mini
- Powering On and Running macOS Setup
- Bringing Your Old Data Across
- Connecting Displays and Peripherals the Right Way
- Running the Mac Mini as a Headless Server
- Performance, Energy, and Everyday Maintenance
- Troubleshooting the Annoying but Fixable Problems
Unboxing and Getting to Know Your Mac Mini
The first thing I do is put the box on the desk and open it slowly, because the contents tell you exactly how Apple expects you to use the machine. Inside, you get the Mac mini unit and the power cable, and that's it. Apple's own user guide makes the point clearly, the Mac mini ships with no built-in display, keyboard, or mouse, so the device is intentionally minimalist and depends on you supplying the rest Apple Mac mini user guide.
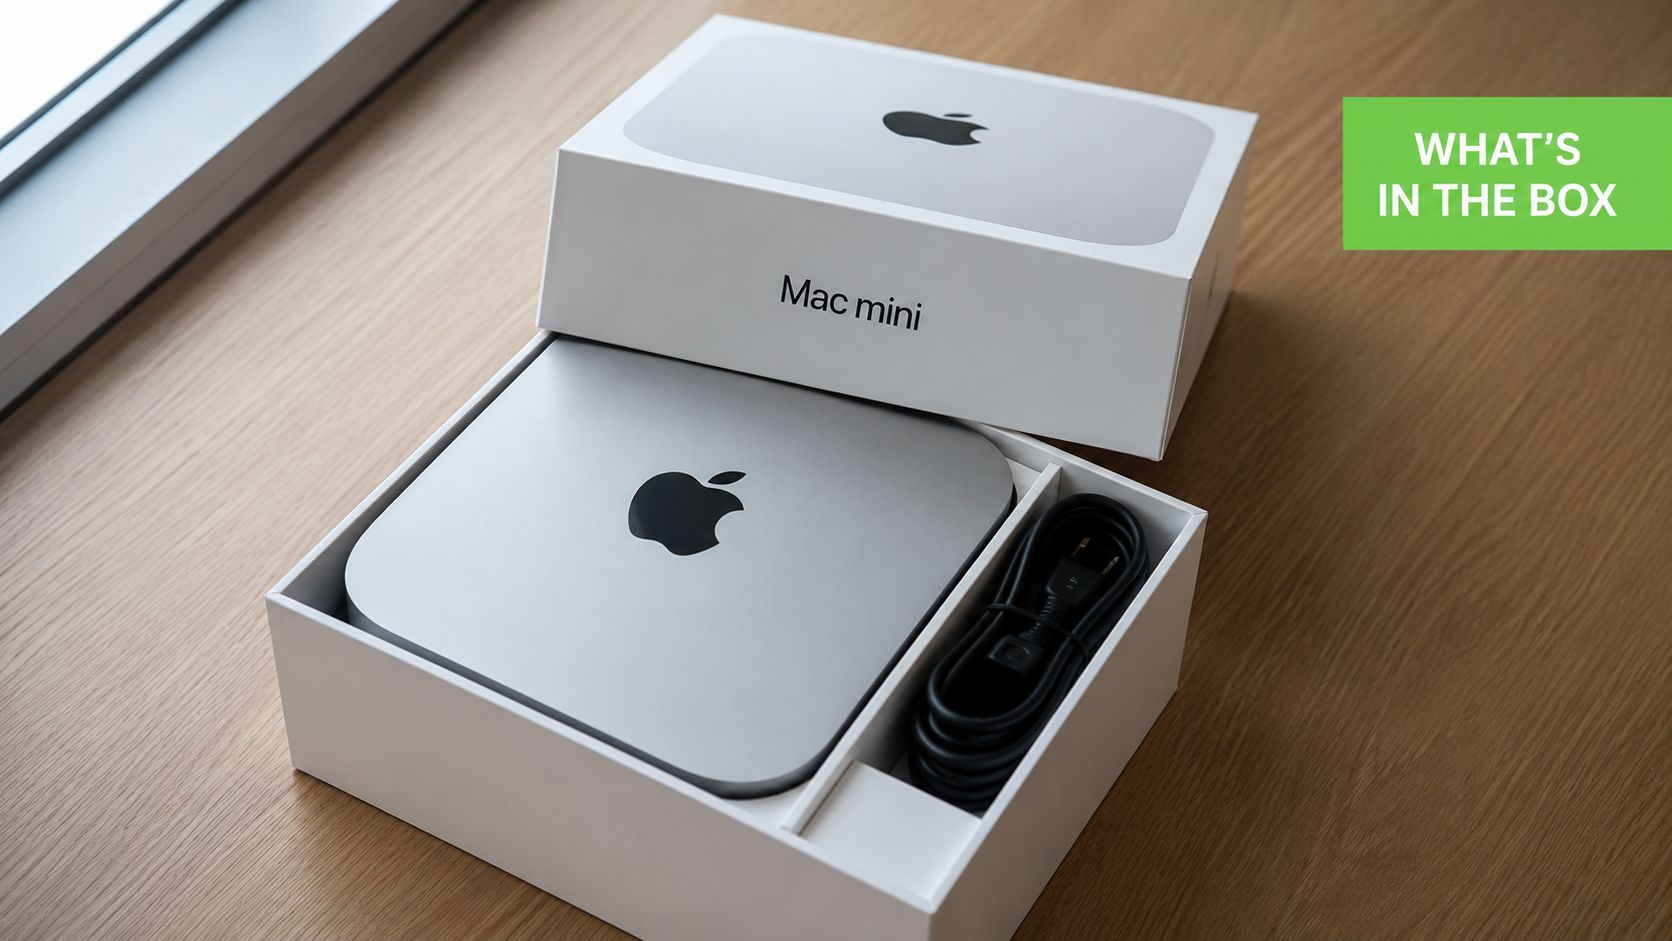
That absence is the reason the Mac mini works so well in Singapore flats, study corners, and shared workspaces. You can pair it with a monitor you already own, reuse a keyboard from an old desktop, and keep the footprint tiny. If you want a practical creative setup, the desk can stay uncluttered while you still get a proper workstation, and if you're mapping out a mixed video, design, and productivity workflow, unify your creative workflow is a useful way to think about how a small machine can sit inside a bigger toolchain.
What the ports actually mean
The back of the Mac mini looks more technical than it is. HDMI connects to your display or TV, USB-A is for older peripherals and drives, USB-C and Thunderbolt are for faster storage and modern accessories, Ethernet gives you stable networking, and the 3.5 mm jack handles headphones or analogue audio. That's the whole puzzle, really, it's just a compact box that expects you to bring the screen and input devices.
Practical rule: place the Mac mini where the cables can breathe. In a cramped desk setup, don't bury it behind a monitor stand or a stack of books if you can avoid it.
The physical power button is easy to overlook because the machine is so small, but it matters during first setup and troubleshooting. Give the unit enough airflow, keep the cable run tidy, and leave space for a drive or hub if you know you'll add one later. If you're buying for a student or a home office, the most sensible starting point is often the smallest stable configuration you can build first, then expand only when the actual workload demands it, which is why a refurbished Apple Mac mini M2 can make sense for buyers who already have the monitor and peripherals.
Powering On and Running macOS Setup
A clean first boot starts with the order of the cables. Plug in the power cable, connect the Mac mini to a monitor with HDMI, then attach your keyboard and mouse before you press the power button Geeks2U Mac mini setup guide. That sequence avoids the usual first-boot headache of trying to pair Bluetooth devices before you have even reached the desktop, which is a common snag in a new desk setup.
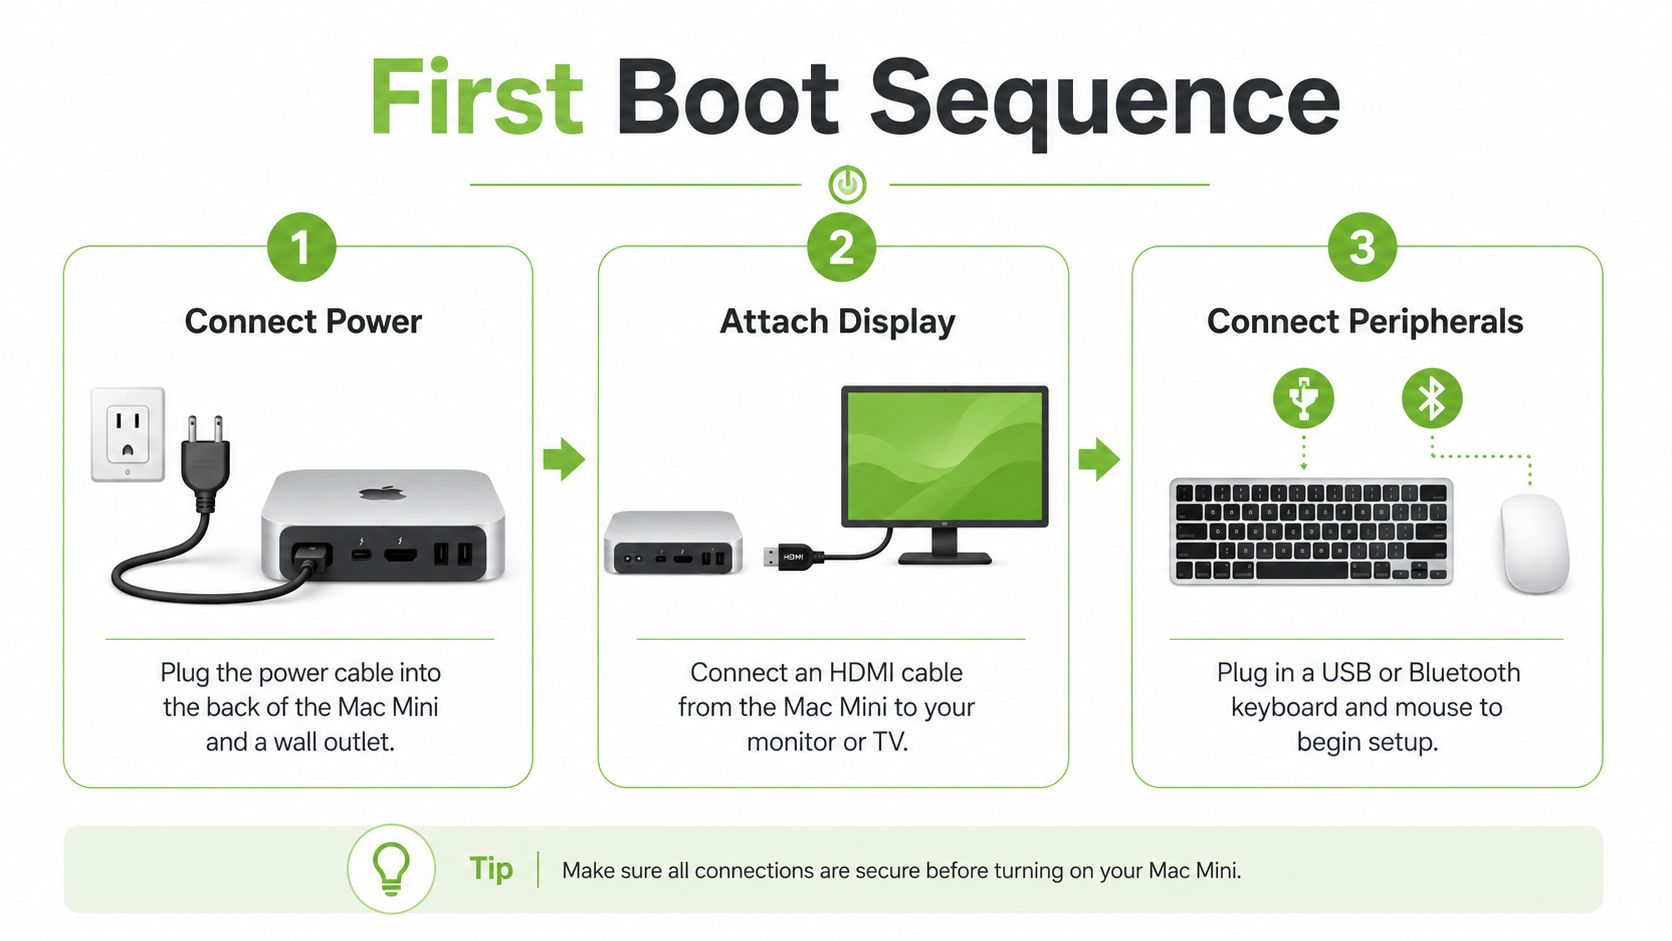
The Setup Assistant screens that matter
The Setup Assistant will ask for a language, a Wi‑Fi network, an Apple ID, and a separate local computer user profile Asurion Mac mini setup guide. That separation matters in real use. The Apple ID handles Apple services, while the local account is the one you use every day to log in to the Mac itself.
For the first boot, wired peripherals are the safer choice because Bluetooth keyboards and mice often need pairing after Setup Assistant begins Mac mini setup video. If your keyboard and mouse are Bluetooth, switch them on and pair them on-screen when prompted. If you have a wired set in a drawer, use that for setup, then swap later once the machine is working properly.
Finish the first boot properly
Once the desktop appears, slow down a little. Sign in, check that the account you created is the one you want, and turn on the security basics before you start loading apps. For a home office or a shared desk, that clean first login reduces confusion later, especially when more than one person uses the same compact machine.
The best habit is to keep the first hour boring and controlled. Connect, sign in, update, then customise. That order keeps the Mac mini usable without turning first boot into a repair job.
Bringing Your Old Data Across
Migration is where people often make the Mac mini harder than it needs to be. If you're moving from another Mac and you already have a Time Machine backup, that's the cleanest route for restoring a familiar system state. If you're moving from a work MacBook or want to bring files across once without recreating the whole old machine, Migration Assistant is usually the better fit.
Choose the transfer method before you click continue
A full backup restore makes sense when the previous Mac was already configured the way you liked it. That's the option for people who want mail, documents, app settings, and account data to reappear as a set. Migration Assistant is the lighter choice when you want a controlled one-time transfer and would rather leave old clutter behind.
For a Windows PC, the smartest move is usually restraint. Bring across what you need first, not every folder and application you've ever collected. The Mac mini works best when the new machine starts clean, especially if you're using it for study, a small business desk, or creative work where you want fewer background issues.
Don't copy everything just because the wizard offers it. A tidy migration is easier to verify, easier to support, and less likely to drag old problems into the new install.
Verify the important stuff after transfer
Check mail, calendars, photos, and documents before you call the job done. Open the apps you use, confirm the accounts are signed in correctly, and make sure shared folders and desktop files are where you expect them to be. If something is missing, fix it while the old machine or backup is still available.
When a Mac mini is being set up as a replacement, the goal isn't to recreate every old habit. It's to preserve the important data and leave the baggage behind. That approach is usually faster, cleaner, and easier to support later.
Connecting Displays and Peripherals the Right Way
Start with the display, because that choice shapes the rest of the desk. HDMI is the least fussy route for a first setup, especially if you are pairing the Mac mini with an existing monitor or a TV and want something that just works. USB-C or Thunderbolt makes more sense when your monitor already supports it, or when you are building a cleaner desk around a dock and fewer visible cables. If you want a desk-friendly monitor that suits that kind of setup, the Apple 27-inch Studio Display sits in the right category for a Mac mini, particularly when the goal is a tidy workspace rather than a pile of adapters.
| Connection | Best for | Caveat |
|---|---|---|
| HDMI | Most first-time setups, TVs, straightforward desks | Adapter-free and reliable, but the monitor has to support HDMI |
| USB-C or Thunderbolt | Cleaner cable runs, docked setups, modern monitors | Can add cost if you need an adapter or dock |
| Dock through USB-C | Multi-device desks, storage and display in one chain | Helpful only when the dock is actually needed |
The connection you pick should also match how long the machine will stay in service. A student desk in a small flat often benefits from the simplest monitor path, while a refurbished Mac mini used for shared office work is easier to live with if the display cable, charging, and peripherals can all stay organized in one place. That is where a dock earns its keep, but only if you already need the extra ports. If you are buying second-hand in Singapore, I would check that the display setup leaves room for future swaps, because the monitor may outlast the computer.
Bluetooth, hubs, and audio trade-offs
Bluetooth keyboards and mice are fine once the machine is already running, but they are not the only sensible choice. A wired keyboard is still the safest first accessory, because it removes pairing delays and battery uncertainty while you are getting the desk working. After that, Bluetooth is useful for a cleaner layout, though I still prefer to keep one wired input device around for troubleshooting or headless use later. That matters more if the Mac mini may eventually move from a normal desk to a cupboard, a living-room shelf, or a small office corner.
USB hubs are worth using when they solve a real port problem, not just because they are available. A cheap hub that struggles with power delivery or disconnects under load can make a tidy desk feel worse than a slightly messier direct connection. Audio has the same trade-off. HDMI can carry sound to a monitor, the headphone jack is the easiest answer for speakers or headphones, and USB-C audio gear only makes sense when your other accessories already follow that standard.
Network choice should match how you work
For a home office, Ethernet is the steadier choice because it keeps calls, backups, and large transfers away from wireless hiccups. Wi‑Fi still makes sense if you want fewer cables, if the Mac mini sits in a bedroom or study, or if the desk layout makes a network cable awkward. The better option is the one that stays out of the way during the work you do.
If the Mac mini also has to support occasional remote access, a wired network gives you a little more confidence when the machine is left on for longer stretches. That same logic applies to peripherals. Choose the few devices you will use every day, wire the ones that should never fail, and keep the rest simple enough to replace without reworking the whole desk.
Running the Mac Mini as a Headless Server
A Mac mini becomes more interesting when you stop treating it like a desk computer and let it sit in the background. Headless use, where the machine runs without a permanent keyboard and monitor, is a strong fit for file sharing, Time Machine targets, content caching, screen sharing, SSH, and remote management. Recent guides also note that this space now overlaps with local AI and home automation use, though the everyday workflow guidance for Singapore broadband setups is still fragmented Mac mini as a server.
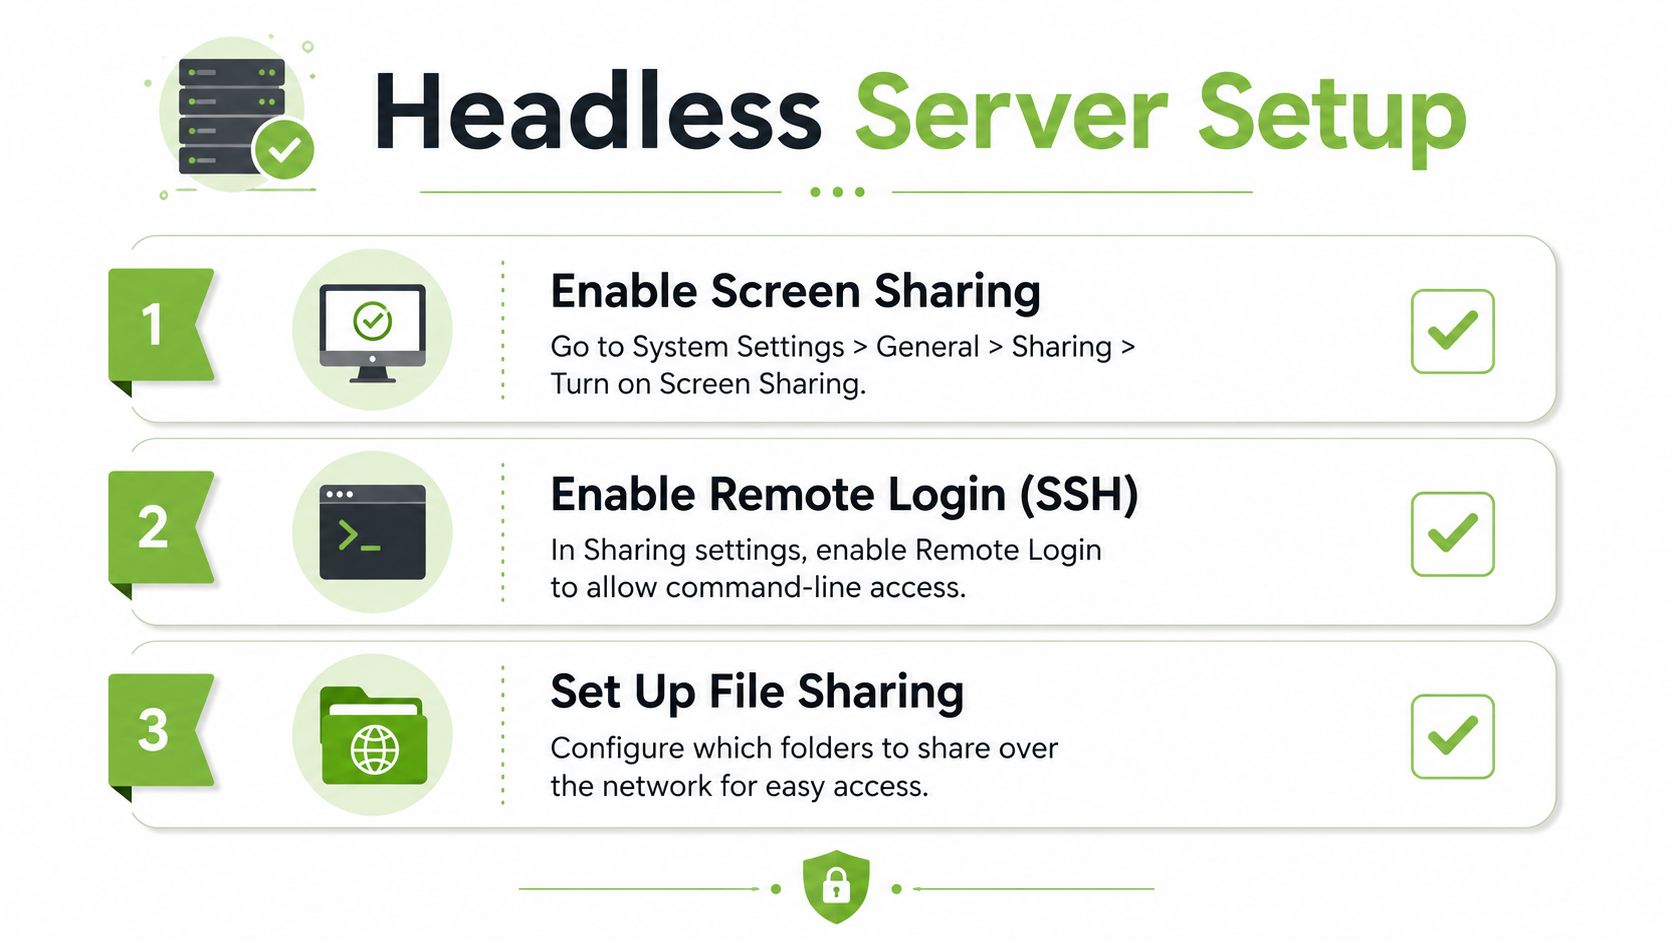
The practical setup for a quiet always-on box
Start by enabling Screen Sharing so you can control the machine remotely when needed. Then turn on Remote Login for SSH access, and set up File Sharing for the folders that should be visible across your network. Those three settings are enough for most home-server style use, whether the Mac mini is backing up a MacBook or serving shared documents for a household.
The next decision is power behaviour. If the machine is going to live behind a monitor or in a cupboard, think about what happens after an outage or after someone flips a power strip off and on. You want predictable startup and easy remote access, not a box that becomes inaccessible when the display is unplugged.
Practical rule: if the Mac mini is doing one job all the time, set it up for that job and resist adding extra services unless you'll use them every week.
Good server jobs for Singapore homes and SMEs
A Mac mini works well as a Time Machine destination for another Mac, a central library for photos and documents, or a light media box for the home. It can also sit at the centre of a small automation stack if you want local AI experiments or simple smart-home routines without committing to a full server rack. For buyers who need a router that won't complicate remote use, a clean network setup pairs naturally with a Nest WiFi router when the priority is stable access rather than desk clutter.
Before you leave it unattended, harden the basics. Confirm sharing settings, keep updates current, and make sure you can still reach the machine when the screen is off. A Mac mini server should feel invisible until you need it, then predictable when you do.
Performance, Energy, and Everyday Maintenance
Once the Mac mini is in regular use, the best upkeep is plain and consistent. Install macOS updates, turn on automatic updates, and set up Time Machine backups right after setup, because that gives you a recovery path if an app update or migration goes wrong. I would rather sort out update settings on day one than find out months later that a machine has missed patches and is harder to recover.
Keep the machine lean
Login items and background apps are the fastest way to make a quick Mac feel slow. Remove anything you do not actively need at startup, then open Activity Monitor if the machine begins to feel heavier than it should. Most Mac mini owners need one stable machine that wakes quickly and stays responsive, not a long list of helper apps running all day.
A small setup habit helps here. On Singapore broadband, a Mac mini that is used for home office work or shared family tasks should stay light at login, especially if it also sits behind a VPN, syncs cloud storage, or serves files for a few users. That keeps the machine easier to live with, and it also lowers the chance that a background app will become the thing that slows an otherwise solid box.
What refurbished buyers should inspect
If you are buying a refurbished or renewed Mac mini, ask direct questions about the unit's grade, warranty, and any disclosure about component health where it applies. At myhalo, the useful question is not just whether the device is refurbished, but whether it has been checked properly, described accurately, and backed by a support path you can use. Certified ReLoved, Certified Surplus, transparent device grading, and a documented quality process matter more than polished marketing.
Practical rule: a refurbished device is only a smart buy if the seller tells you what was checked, what was replaced, and what support you get after purchase.
The lifecycle angle matters here. Extending a Mac mini's life through reuse, repair, and responsible recycling is not just a sustainability story, it is a cost and resilience story for households and SMEs. A unit that is clearly graded and professionally verified is easier to budget for, easier to redeploy later, and less likely to become dead stock after a minor fault. For buyers in Singapore, that also makes practical sense in tight home offices, small studios, and classrooms where space is limited and a machine often has to do more than one job over its life.
Troubleshooting the Annoying but Fixable Problems
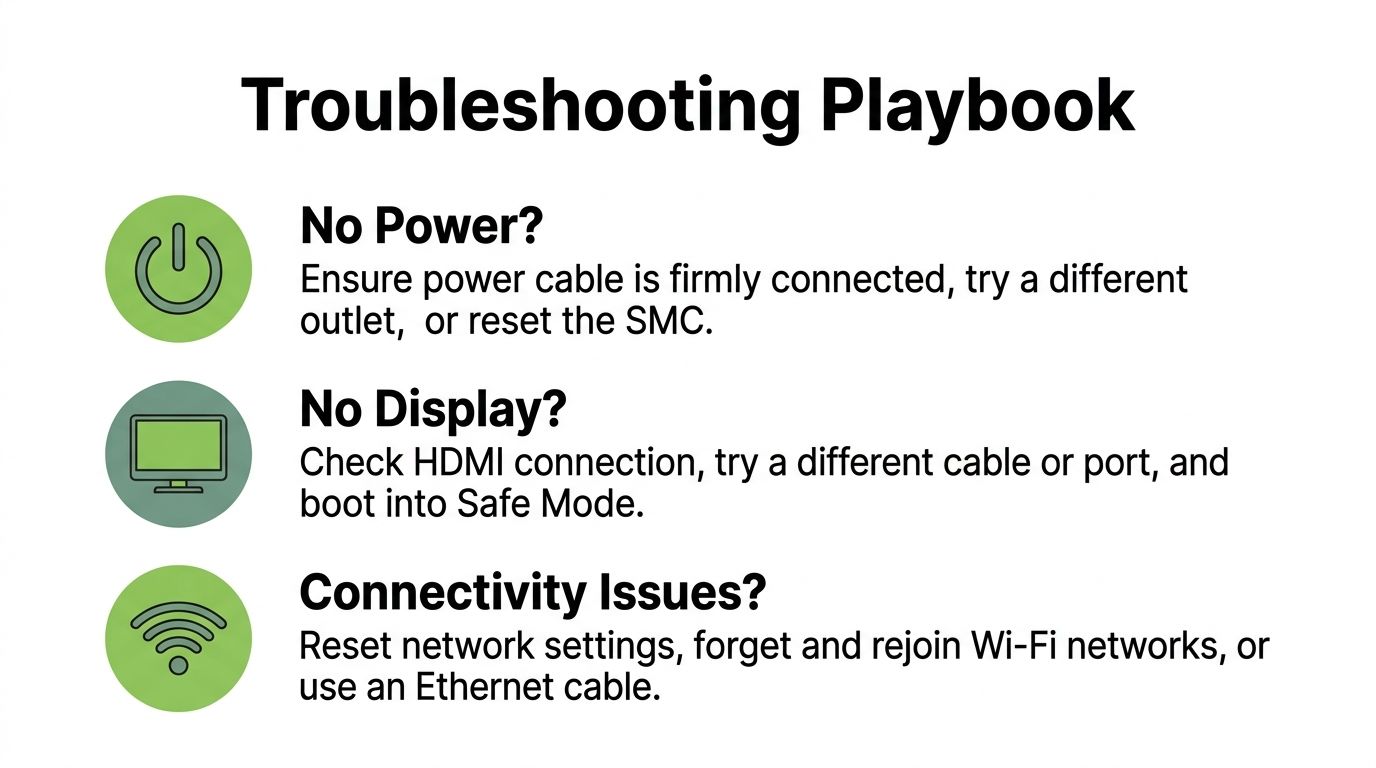
A Mac mini problem often looks bigger than it is. If it will not power on, check the power cable, the outlet, and the power button first. If the screen stays blank, work through the HDMI path before blaming the machine. Try another cable or another port, then move on only if the display still refuses to wake.
When peripherals are the problem
Older Apple Mac mini guidance shows that recovery and diagnostics can require every external device to be unplugged except the display, keyboard, and mouse, which is a good test when startup is failing or an accessory is getting in the way Apple Mac mini troubleshooting guide. I follow that same approach during diagnosis. Keep the setup bare, test again, then reconnect devices one at a time.
Wi‑Fi and Bluetooth problems usually come from pairing order, weak signal, or a confused accessory rather than a broken Mac. Forget the network, join it again, or switch to Ethernet if the connection keeps dropping. If a Bluetooth keyboard vanishes during setup, use a wired keyboard and keep going.
Recovery tools without the drama
macOS Recovery, NVRAM reset, and Apple Diagnostics sound technical, but they are just startup tools. Use them after the basic checks fail, not as the first response to every slow boot or frozen app. If the Mac mini still fails with a clean boot path and only the necessary peripherals attached, the problem is more likely a hardware fault or a deeper software issue that needs service.
The practical order is simple. Test the cable, test the display path, test the network, then test the machine. That sequence solves more Mac mini problems than a random reset ever will.
myhalo helps you make that next Mac mini decision with less guesswork, whether you want a clean refurbished unit, a wider choice of graded devices, or support that keeps older hardware useful for longer. If you're comparing options for a home desk, a student setup, or a small office server, visit myhalo to see how Certified ReLoved, Certified Surplus, and practical device support can fit the way you work.