





Mac Screen Repair in Singapore: What You Need to Know
Your MacBook slips from a Grab footrest onto HDB corridor tiles. The display lights up, but the image is crossed by lines, the lid no longer closes evenly, and you're left wondering whether to call Apple, an Authorised Service Provider, or the nearest repair shop. An iMac can land in the same situation after a house move, especially when a contractor shifts furniture too quickly.
Don't start with the cheapest quote. Start with triage. A cracked Mac screen may involve only the outer glass, the display panel, the backlight or flex cable, or the hinge and housing. Each failure mode changes the parts required, the sensible repair channel, and whether a display replacement will solve the problem.
Singapore conditions add practical complications. Humidity, dust and particulate exposure around MRT workstations can affect connectors and cooling paths, while the market ranges from Apple Orchard and Authorised Service Providers to neighbourhood workshops in Sim Lim Square, Tampines and Jurong. This guide helps you identify the fault first, protect your data, then choose the most sensible repair or replacement path.
Table of Contents
- A Cracked Mac Screen and What to Do First
- How to Tell What Kind of Screen Damage You Actually Have
- Back Up Your Mac Before Any Repair
- Apple, Authorised Service Providers, or Independent Workshops
- OEM, Refurbished and Aftermarket Display Panels Explained
- Matching Repair Choices to Your Mac Model and Budget
- What Happens During Service and How to Verify the Repair
A Cracked Mac Screen and What to Do First
The first hour after an impact matters more than the first repair quote. A damaged display can keep working while pressure on the lid, a bent hinge or loose fragments create a larger problem.
Stop the damage from spreading
- Power the Mac down. If the display still works, save your files and shut down normally. If the screen is flickering, showing black patches or producing unusual heat, hold the power button only long enough to turn it off.
- Don't press on the glass or repeatedly open the lid. A crack can expose sharp edges, and pressure can damage the internal display layers or flex cable.
- Photograph the device. Capture the screen, corners, hinge, underside and serial number. These images help with an AppleCare+ or insurance claim and create a record of the condition before service.
- Check whether the Mac boots. Listen for startup sounds, keyboard activity and trackpad feedback. If possible, connect an external display. A working external image suggests the computer may still be healthy even if the built-in panel is not.
- Record the symptoms. Note whether the image is visible, whether brightness changes, whether the lid closes flush, and whether Touch ID or the power button still responds.
A useful preparation step is to understand the wider device-care process, including what to do when another personal device has a damaged display. myhalo's guide to phone screen repairs is relevant for that broader planning.
Practical rule: Treat a cracked display as a failure-mode investigation, not a screen-only purchase.
Don't authorise a replacement until the technician has checked for hinge stress, enclosure distortion, backlight failure and board-level damage. The rest of the decision should follow that diagnosis, not a generic model name or an attractive headline price.
How to Tell What Kind of Screen Damage You Actually Have
You can narrow down the likely fault before visiting a service centre. The aim isn't to perform a repair at home. It's to give the technician a useful symptom record and avoid paying for a part that won't fix the underlying problem.
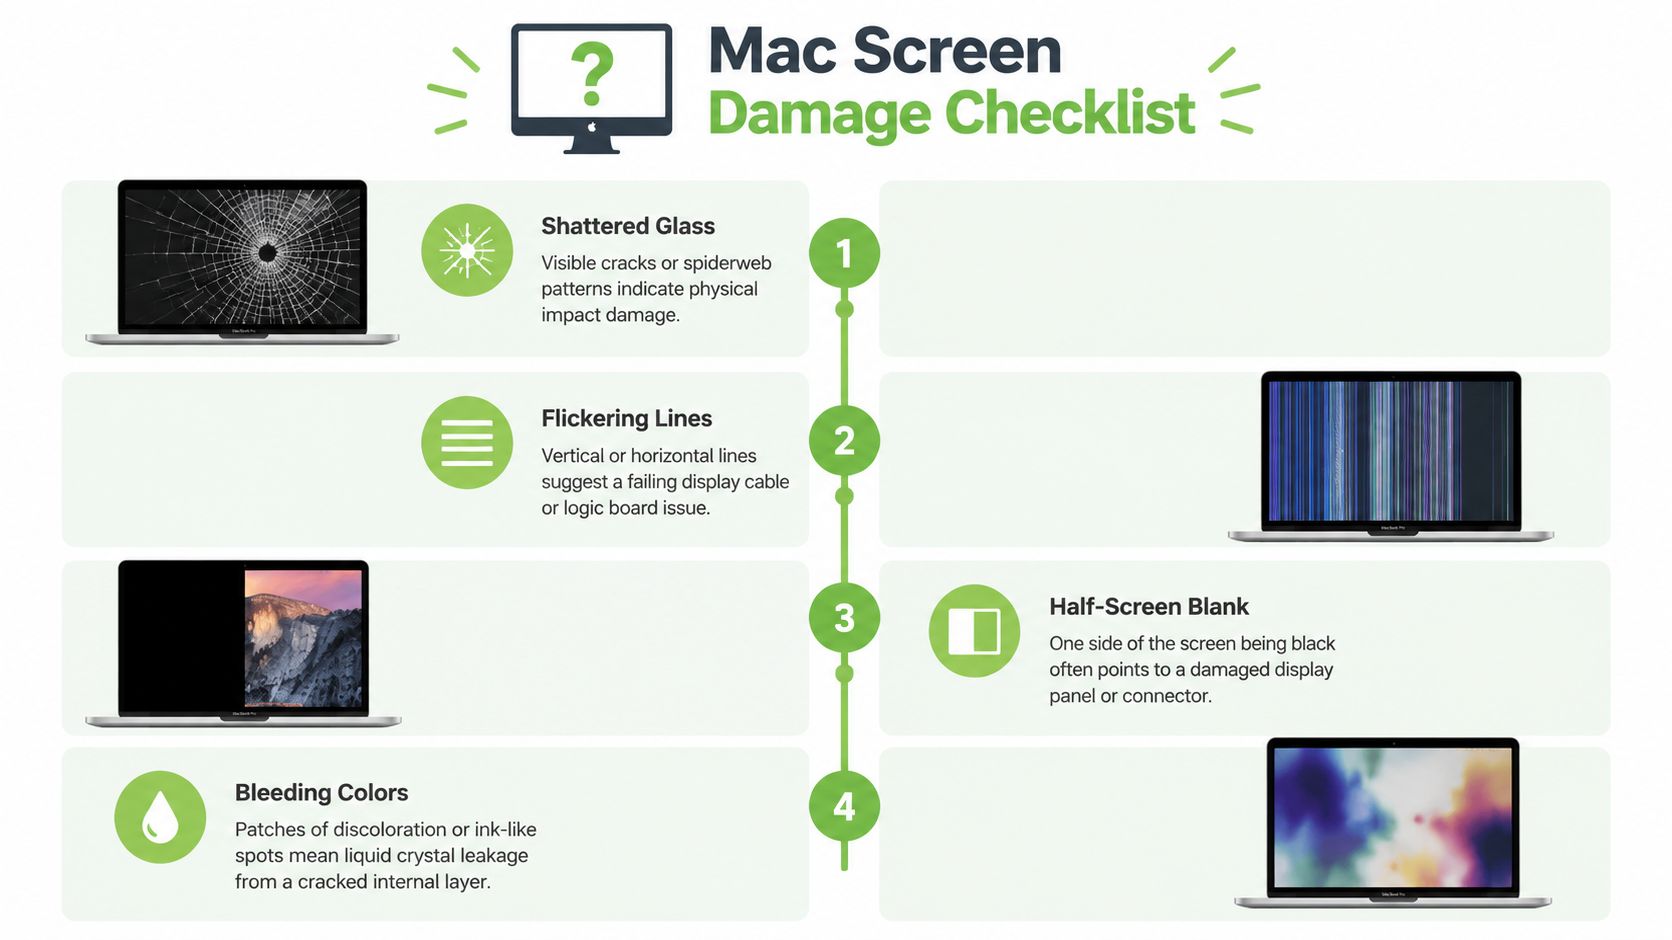
Match the symptom to the failure
- Glass-only damage: You can see spiderweb cracks, but the image remains clear, brightness is normal and touch, where relevant, isn't part of the Mac interface. On many MacBooks, the glass is bonded to the display assembly, so a shop may still recommend replacing the complete assembly rather than separating the outer layer.
- Panel damage: Black blobs, bleeding lines, a permanently blank half, coloured patches or distorted sections indicate damage inside the panel. A panel replacement or complete display assembly is more appropriate than cosmetic glass work.
- Backlight or flex-cable failure: Shine a torch across a dim screen. If you can make out the desktop or login window, the image may still be present while the backlight has failed. Flickering that changes when the lid moves can point towards a display cable or connector problem.
- Hinge or housing damage: If the crack changes after opening and closing, the lid doesn't sit flush, or the hinge feels unusually tight, replacing the display alone is risky. The technician should inspect the hinge mounts and top case before quoting.
Run simple checks without forcing the lid
On a MacBook Air M1 or M2, boot normally and connect an external monitor if available. For a MacBook Pro from the 13-inch through 16-inch range, the same external-display test helps separate a built-in display fault from a graphics or logic-board problem. A 24-inch iMac needs a different approach because its display and computer are integrated into one desktop enclosure.
Apple Diagnostics can help identify hardware faults. On supported Macs, start the diagnostic process and use the display-related test prompt, including the D key where Apple's instructions call for it. Safe Mode is useful for ruling out software behaviour, such as a display process or startup extension causing flicker, but it can't repair impact damage.
A 4K monitor is a practical confirmation tool. If the external image is stable while the internal panel is not, the logic board and graphics path are more likely to be functioning, although only a technician can confirm that conclusion.
2021-and-newer MacBook Pro models with Liquid Retina XDR and ProMotion deserve panel-level diagnosis. Ask whether the proposed repair preserves brightness control, colour behaviour and refresh-rate functionality. Also record Touch ID, the power button, trackpad clicking and lid alignment, because these details define the repair scope.
Back Up Your Mac Before Any Repair
A cracked display can turn a routine repair into a data-recovery problem. Back up your Mac before handing it over, even when the technician expects the storage to remain untouched. Your goal is to give the technician a useful symptom record and avoid paying for a part that will not fix the underlying problem.
Use a layered backup plan
Start with Time Machine on an external drive. Let the process finish, then restore an ordinary file to verify that the backup works. A backup listed in the menu but never tested gives you limited protection.
Save a second copy of important work to an approved cloud service or another external drive. Store the most valuable documents separately from the Mac. Business users should export active project folders and confirm that colleagues can open the latest versions.
Apple Silicon Macs and Macs with the T2 security chip encrypt internal storage. A repair provider generally cannot remove the SSD and read the files directly. Recovery depends on your login password or FileVault recovery key, so keep the required details available and share only the credentials the service needs.
If the display prevents login
Connect an external monitor if the Mac still boots. That may give you enough visibility to sign in and complete the backup. If it does not, a technician may use USB-C transfer, another Mac with Migration Assistant, or a compatible Thunderbolt 3 dock with a charged Mac and external display. The suitable method depends on the model, operating system and boot condition.
Singapore's PDPA makes the device owner responsible for protecting personal data. A screen replacement does not always require erasing the Mac, but a factory reset deserves serious consideration before an independent workshop handles a device containing sensitive customer, financial or health information.
Before collection, export iPhone backups synced to the Mac. Record project locations for Creative Cloud, Logic and Final Cut, then sign out of Apple ID, Find My and iMessage where appropriate. If an older Mac is already being opened for another repair, review Apple's service guidance on MacBook battery replacement as part of the same repair planning.
Apple, Authorised Service Providers, or Independent Workshops
The right channel depends on ownership status, coverage, model age and your tolerance for turnaround time. Apple and Authorised Service Providers generally keep the service chain closest to Apple's process, while independent workshops can offer more flexible parts and pricing choices.
Apple states that Mac products may receive service and parts from Apple service providers for at least five years after the product was last distributed, and potentially longer up to seven years, depending on law and parts availability. In Singapore, Apple also identifies a possible battery-only repair period of up to 10 years from last distribution, subject to parts availability. Service workmanship and parts are generally covered for 90 days, according to Apple's Singapore repair terms.
Apple's standard warranty mainly covers manufacturing defects for one year and doesn't cover accidental damage such as a cracked screen. Apple's service page lists Mac laptop screen damage under AppleCare+ at S$69, while accidental damage without that coverage is listed at S$209. Check eligibility before comparing independent quotes.
| Channel | Typical Cost (SGD) | Turnaround | Parts Quality | Warranty Impact |
|---|---|---|---|---|
| Apple | Apple's service pricing depends on coverage and model | Often longer than a neighbourhood workshop | Apple service parts and processes | Best fit for preserving AppleCare+ route |
| Authorised Service Provider | Quote varies by model and coverage | Often longer when parts must be ordered | Apple-authorised service path | Ask how AppleCare and service claims apply |
| Independent workshop | Commonly lower or more flexible | May be faster when the correct part is in stock | OEM, refurbished or aftermarket, depending on quote | May affect Apple coverage, confirm in writing |
Established independent operators may provide their own warranty, documented intake and business support. Smaller neighbourhood shops often compete on speed and price, but you must ask how they handle a failed replacement, dead pixels or a second fault discovered after opening the device.
Ask before approval: “What exactly are you replacing, what part tier is it, what does your warranty cover, and will this affect AppleCare+?”
Choose Apple or an Authorised Service Provider when AppleCare+ matters, the Mac is relatively new, or you need the strongest continuity of service records. Choose an independent workshop when the Mac is older, coverage has expired and the provider can clearly explain the diagnosis, parts origin and warranty.
For a Singapore-specific overview of the official route, consult this practical guide to an Apple service centre in Singapore.
OEM, Refurbished and Aftermarket Display Panels Explained
A repair quote that says “screen replacement” is incomplete. The part may be an OEM panel, a refurbished original panel or an aftermarket assembly, and those choices affect colour, brightness, calibration, battery behaviour and long-term reliability.
An OEM panel comes through Apple's authorised supply chain and is designed to match the original display specifications. For a Retina Mac, that includes expected brightness, P3 colour coverage and True Tone functionality where supported. It's usually the least ambiguous choice, particularly for photographers, designers and businesses that depend on consistent colour.
A refurbished panel is an original display recovered from a donor or returned device, then tested and repaired where necessary. A well-sourced refurbished unit can perform very close to the original while costing less, but the provider should disclose its condition and testing process. Ask whether the panel has been inspected for dead pixels, uneven brightness and marks behind the glass.
An aftermarket panel is made outside Apple's authorised supply chain. Quality varies sharply. Some panels may closely follow original specifications, while others can have weaker viewing angles, lower brightness, colour variation or no True Tone support. An inaccurate panel can be frustrating for creative work, and a poor assembly can create battery drain or sleep-wake behaviour that wasn't present before.
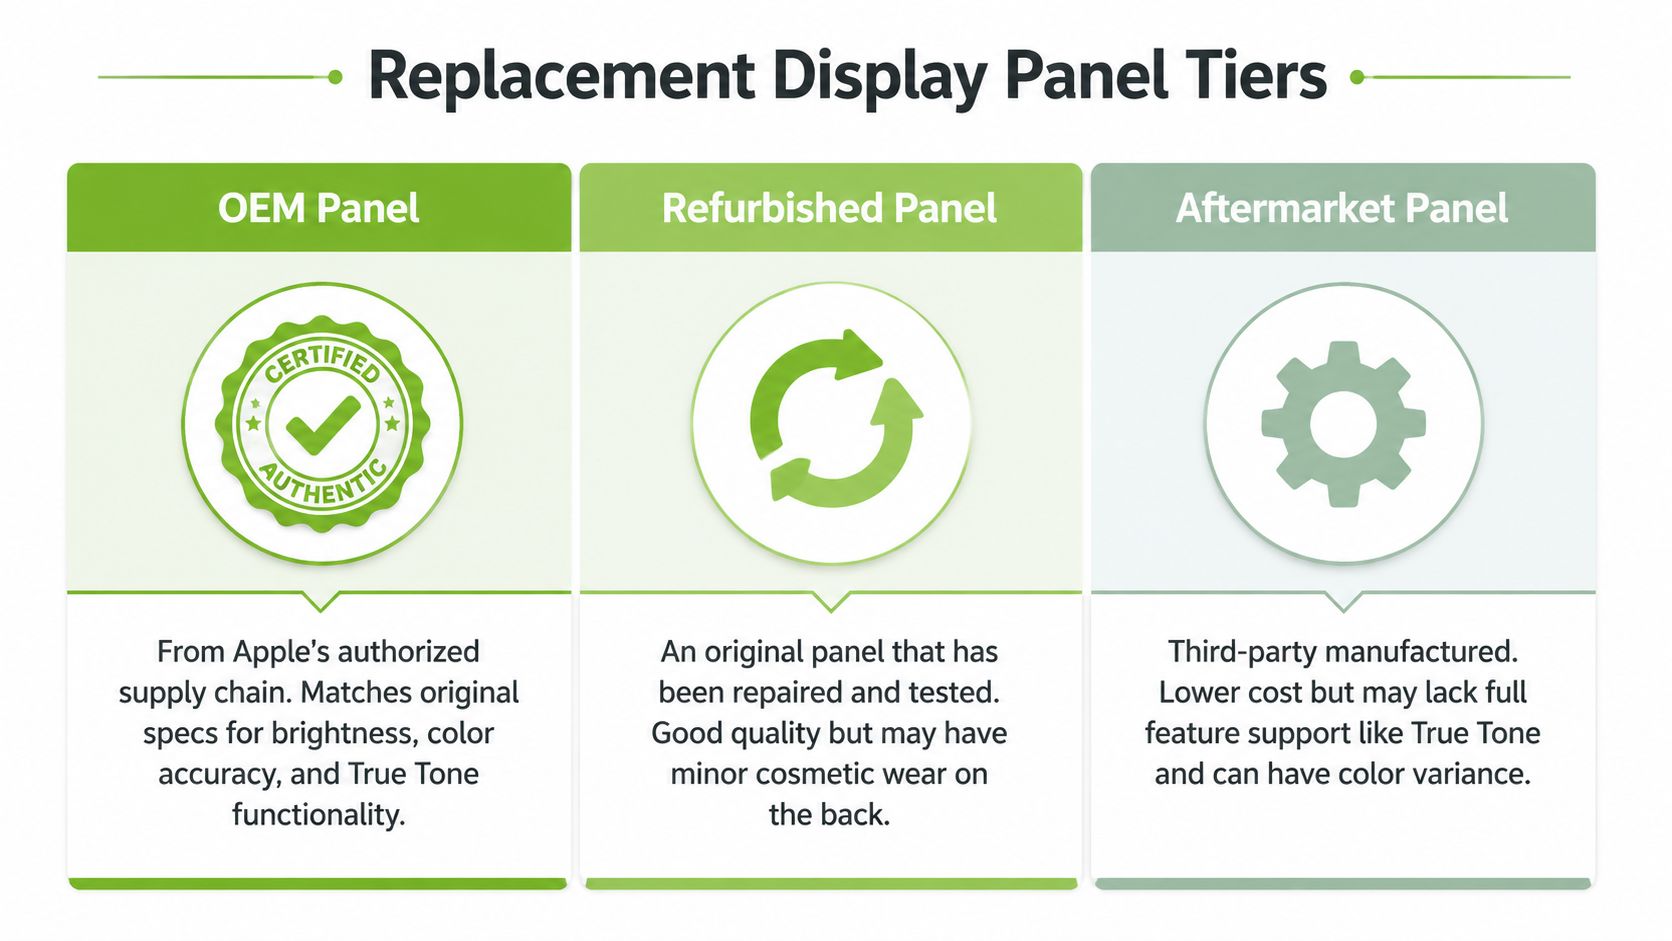
Check the assembly, not just the panel
Retina MacBooks use tight lid and hinge tolerances. A replacement that sits slightly off can make the lid feel uneven, expose pressure points or allow dust into the edge. Ask whether the quote covers the complete display assembly, camera alignment, True Tone transfer and post-installation calibration.
Don't accept “original quality” as a parts description. Request the actual tier, warranty period, brightness and pixel-testing policy, and the remedy if True Tone or automatic brightness stops working.
Matching Repair Choices to Your Mac Model and Budget
A MacBook Air M2 with a cracked display can fall near the lower end of published repair ranges, while a 16-inch MacBook Pro with Liquid Retina XDR can reach the higher end. Singapore specialists publish MacBook display assembly pricing around S$300 to S$700 and above, as shown in this Singapore MacBook repair pricing overview. Other local listings place many screen replacements from about S$150 to S$358 before GST, depending on the model and part, according to this MacBook screen replacement listing.
For iMac owners, one Singapore service centre lists screen repair from S$328 for older 21.5-inch models, S$438 for 21.5-inch Retina 4K units, S$458 for 27-inch and 27-inch Retina 5K models, and S$648 for 24-inch M1, M3 and M4 models, before GST. Its stated repair windows are roughly 1 to 3 hours, depending on the model, as shown in this iMac screen repair pricing guide.
| Mac Model | Screen Repair (SGD) | Recommended Channel | Notes |
|---|---|---|---|
| MacBook Air M1 or M2 | Around S$150 to S$700+ depending on part and diagnosis | Independent specialist or Apple route if covered | Confirm panel tier, lid alignment and AppleCare+ |
| MacBook Pro 13-inch M-series | Around S$150 to S$700+ depending on assembly | Compare authorised and established independent providers | Check Touch Bar or Touch ID function where fitted |
| MacBook Pro 14-inch or 16-inch M-series | Often towards the higher end of published ranges | Apple or a specialist with exact model experience | Liquid Retina XDR and ProMotion need careful testing |
| Intel MacBook Pro models | Varies by year, panel and housing condition | Repair only after checking overall device value | Older models may justify replacement instead |
| 21.5-inch or 27-inch iMac | From the published Singapore iMac ranges | Specialist with model-specific tooling | Confirm panel size, adhesive work and stand stability |
| 24-inch iMac M1, M3 or M4 | Published example from S$648 before GST | Apple or an experienced iMac specialist | Integrated design makes parts and labour selection important |
Use the table as a starting point, then check the full diagnosis. A display-only fault may suit a panel or complete lid assembly. A hinge problem, liquid exposure or logic board fault changes the repair value and may require broader work. Confirm the exact model, failure mode, part tier, warranty and whether the quote includes labour, calibration and GST.
For comparison with another market, Nerds 2 You Edmonton repair rates shows how repair pricing is assessed elsewhere. Singapore labour, parts availability and GST differ, so use it for context rather than as a local quote.
A newer Mac with AppleCare+ usually deserves a claim. An older Mac with a healthy battery, good keyboard and stable logic board can justify an independent repair. If water entered the device or the hinge bent the enclosure, price the full risk before authorising a display replacement.
What Happens During Service and How to Verify the Repair
A professional repair begins with an intake record, not a screwdriver. The provider should note the serial number, visible damage, accessories received and your description of the fault. Ask whether diagnostics carry a fee, whether the quote changes after opening the device, and whether your data will remain intact.
Apple Stores and Authorised Service Providers normally verify the serial number against coverage and parts eligibility before issuing a repair authorisation. Independent workshops should provide an equivalent written record, even if their process is less formal. No provider should start additional paid work without your approval.
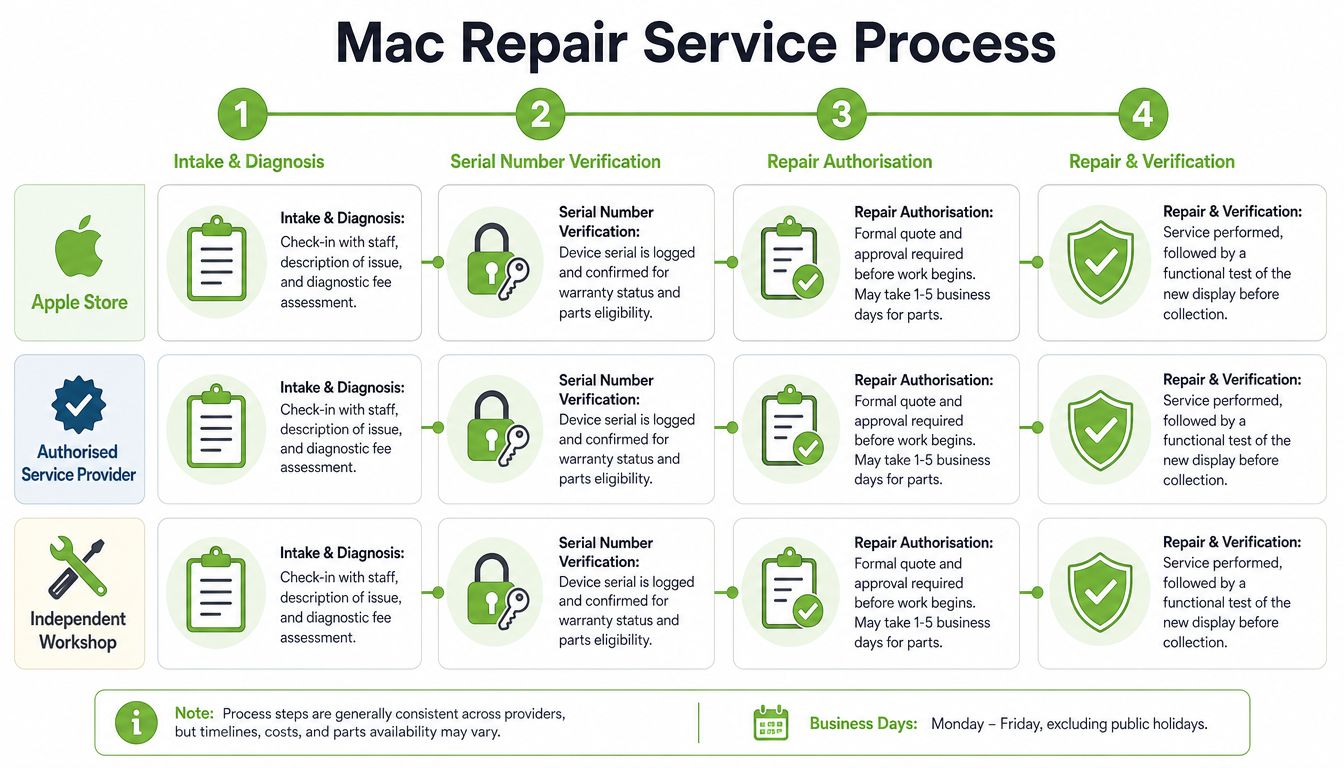
What to expect at drop-off
A straightforward display replacement can sometimes be completed within the same day when the correct part is in stock. More complicated jobs involving a hinge, connector, liquid exposure or logic board may require longer assessment and parts ordering. Apple also provides repair-status tracking for existing jobs, which helps when a screen fault forms part of a larger ticket.
Ask these questions before leaving the Mac:
- What is the diagnosed failure mode? Get the answer in plain language.
- Is the quote for a panel, complete display assembly, hinge, cable or board repair?
- Which part tier will you install? OEM, refurbished or aftermarket should be stated.
- What does the warranty cover? Clarify dead pixels, flickering, colour problems, hinge movement and labour.
- Will AppleCare+ remain usable? Ask before using an independent provider.
- What happens if another fault appears after opening? Require approval before extra work.
- What documents will I receive? Keep the intake form, quote, invoice, serial number and warranty terms.
The provider may preserve your data, but don't rely on that assumption. Your backup is the protection that matters. If the repair requires a logic-board replacement or a security reset, the data outcome can differ from a screen-only job.
Collection-day verification
Bring time to test the Mac at the counter. Don't collect it, place it in your bag and discover a fault at home.
- Inspect solid colours. Open white, black, red, green and blue backgrounds to look for dead pixels, dust, bright spots and uneven patches.
- Check brightness uniformity. Move from minimum to maximum brightness and inspect the entire display, including corners and edges.
- Test colour behaviour. Use the macOS Display Calibrator Assistant to compare the result with a known-good reference image. Creative users should check skin tones, neutral greys and brand colours rather than relying on the login screen.
- Exercise the hinge. Open and close the lid through its normal range. It should move smoothly, remain stable and close flush without the image changing.
- Test the rest of the Mac. Confirm the camera, microphone, speakers, keyboard, trackpad, Touch ID, charging and external display connection.
- Check the identity. Confirm that the serial number still matches the original device, including the underside marking where present, and compare it with your intake documentation.
If you spot cosmetic damage or a functional issue, photograph it immediately and report it on the collection record. Don't rely on a verbal promise. A written warranty claim is easier to escalate when the invoice identifies the part and the date of service.
Repair is one stage in the lifecycle
After service, decide whether the Mac should stay with you, enter the used market or move to another user. A repaired MacBook Air M1 or M2 can remain a practical choice for students and remote workers through 2027 and beyond as a projection, provided its battery, keyboard and logic board remain healthy. Older Intel models often make more sense as a planned handover rather than repeated repair spending.
Apple's Certified ReLoved programme is available through selected Authorised Resellers in Singapore. Eligibility depends on the model year and the programme's assessment, so ask for the current trade-in credit rather than assuming repair cost will be recovered. Apple Trade In prioritises convenience, while third-party buyback platforms and direct sales on Carousell or through refurbishers may involve more effort and different payout expectations.
A lifecycle partner such as myhalo can combine repair assessment with trade-in, reuse through Certified ReLoved and Certified Surplus devices, RescueAdvise, responsible recycling, and data-aware device migration. Its process includes 30-point quality checks, transparent device grading and battery health disclosure, alongside ISO 9001 and ISO 27001 certifications. Those details matter when an SME needs a reliable handover record rather than the lowest purchase price.
For an unrepairable Mac, use Apple GiveBack or an authorised e-waste collection point. Singapore locations include IMM and other collection sites, so don't leave a damaged Mac in general rubbish where its battery and electronics become a handling risk.
For a triage-first assessment, repair options and practical next-step advice, visit myhalo. Ask the team to assess whether your Mac needs a display replacement, hinge or board diagnosis, or a more sensible trade-in, Certified ReLoved or Certified Surplus replacement.